The JQ6500 modules are simple modules which can play standard mono or stereo MP3 files, you can control with buttons (no programming needed), or via a serial communications protocol (JQ6500 Arduino Library available).
Models
JQ6500-28p

JQ6500-28P has onboard memory also but additionally includes a Micro SD card slot so you can simply put your MP3 files on a Micro SD, this is the best option if you have a larger number of MP3s, larger MP3 sizes or use an operating system other than Windows as you simply need a standard FAT formatted Micro SD card. If you are making a music player, this is the one you want.

 JQ6500-16p
JQ6500-16P has an onboard 16Mbit (2 Mega Byte) Flash memory.
Using a Windows (Chinese language but just two-clicks to browse your files and select to upload – so you can manage) software which is embedded into the device and appears when you connect it to USB you can upload your MP3 files directly to the device.
This is a good option if you just need a few small low bitrate MP3s which won’t change often. If you are making a game with a few pew-pew sounds, perfect.
There are two versions of the 16p, their pinout and functionality is the same, the only practical difference is that the new one (V2.1) has a Micro-USB instead of a Mini-USB connector.
Voltage and Power Supply
On the subject of voltage, the datasheet says 供电在3.5V-5V 最佳为4.2V which google translates as “Power supply at 3.5V-5V is best for 4.2V”
I usually power at 5v.
Please note that if you are controlling the “simple control with manual buttons to ground” using Arduino pins instead of buttons, do not do digitalWrite(HIGH) feeding into those inputs, at best it won’t do what you want (and at worst might damage the device) – instead you could toggle between INPUT and OUTPUT pinMode for the pin.
Note also that with a 5v Arduino if talking to the device over serial you should use a 1k resistor in series between Arduino TX and JQ6500 RX.
Insufficient Power Symptoms
The most common problem you will experience when your power supply is not up to the task is a “tick tick tick tick” type of sound, usually followed by a reset, either at the start of playing a track or sometime during (when the volume of the track increases).
A computer USB port is probably not sufficient, if you want to power from the USB socket then I suggest to use a USB power supply capable of 1A at least, and a reasonable quality cable able to deliver that full 1A without dropping much voltage – remember, if your cable is long or poor or both then it throws volts away that the MP3 player needs!
The BUSY LED
People may confuse the BUSY LED with a power led, this led lights when playing, when not playing the LED may have a very very very VERY dim appearance or not light at all, this is normal, the BUSY LED lights when playing. If your LED doesn’t light and you can’t get it to play either, then see the insufficient power symptoms above.
MP3 Format
The devices can play most Stereo MP3 files.
I found that a “Joint-stereo” file did not appear to work, but simply re-encoding to an ordinary stereo file was fine – I use the LAME Audio Encoder to re-encode it, “lame -m s inFile.mp3 outFile.mp3”, see below for other tips about re-encoding files.
The following sampling rates are supported: 8 / 11.025 / 12 / 16 / 22.05 / 24/32 / 44.1 / 48 kHz
SD Card Files
The 28P can support (supposedly, not tested) up to 32g Micro SD Card (aka TransFlash / TF), files can be split into up to 100 folders, with 1000 files.
Any old file names work fine.
It’s unclear which files the 5 “hotkeys” correspond to but I suspect it is the first 5 files in the FAT table (Google for a FAT sorter utility suitable for your operating system), although there is a mention in the datasheet of naming folders 00 .. 99 and the files within the folders 001.mp3 .. 999.mp3 so that may have something to do with it (or might just be convenient to name them like that and use a FAT sorter).
Tips for Re-encoding files
For the 16P particularly due to the limited space in the on board flash, you may wish (need) to re-encode your MP3 files to shrink them, using a lower bitrate. The utility program “lame” can do this on the command line easily for Linux and Mac (obviously once you install it) the phone preset reduces the files to 16kHz and 16kbps which can reduce files significantly (with commensurate loss of quality).
$ lame --preset phone inputFile.mp3 outputFile.mp3Or to really get it down, add -B 8 --resample 8 to the command in order to bring it down to 8kHz and 8kbps.
On Windows, try winLAME
For the 28P if you are using an SD Card, you might as well stick with higher quality and get a bigger SD Card :-)
Uploading to the on-board memory.
You don’t need to use this if you are using an SD Card on the JQ6500-28P, for SD Card just copy your files to it normally!
The on-board memory can be uploaded to using a Windows computer (Mac or Linux users you will need to use the JQ6500-28p and an SD Card), here is a Video showing you the steps to follow…
- Attach the device to your computer over the Mini USB connector.
- A new “CD Rom” drive will appear in your computer, and you can open this drive
- An application is present in the drive, you can open this application
- The application is in Chinese language, but don’t worry, it’s just a couple of clicks
- Click the second tab from the left
- Click the button on the tab
- A file selector will open, select all the mp3 files you wish to upload (remember the space available is quite small, see the re-encoding tips above)
- Click the Open button on the file selector
- Click back to the first tab
- Click the button to upload the files
Uploading to JQ6500-16P With Linux
A third party tool is available to upload to the JQ6500-16 with Linux based computers…
https://github.com/NikolaiRadke/JQ6500-rescue-tool
Fix Missing Uploader Program With JQ6500-16P
There have been reports that some eBay sellers etc are selling JQ6500-16P devices which do not have the MusicDownload.exe installed on them, if you can’t find the MusicDownload.exe program, you can download this zip file which contains it.
Download the JQ6500 Download/Upload Program Here
This is for the JQ6500-16P module, for the SD Card module you of course just put your mp3 files on the sd card.
There have also been reports that running the MusicDownloader.exe externally doesn’t work, in which case you can use this third party “Rescue” tool…
Or if you are really stuck you can download this zip file which contains some rar files, one of which contains ISOs and a Windows .exe file to burn them, usage of this is up to you I have not tried it!
JQ6500 ISO and Exe Pack Download
English Language MusicDownload.exe Uploader for JQ6500-16P
By way of Nikolai Radke an English Language version of the MusicDownload.exe tool has been received, this is not yet tested by me and use at your own risk, but put here in case you would like it.
English Language MusicDownload.exe v1.2a
Audio Output
The modules both feature a built in speaker driver for a single (Left Channel or Mono) speaker on the SPK+ and SPK- pins, the volume of this output can be controlled, the speaker can be 3W, 8 Ohm. This provides a very convenient ability to drive a speaker for a simple mono sound playback without needing an external amplifier.
Additionally the Left and Right stereo channels are output on the DAC-R and DAC-L pins which you can feed into an amplifier along with a ground, I believe these are 0-3v relative to module ground.
Control Methods & Wiring
The modules can be controlled in 5 ways, which you choose depends on your specific application…
- Manual control by using buttons to ground the K*, NXT/PRV, PL/PAUSE, SRC pins
- Manual control by using buttons and resistors to “signal” the requested action through the ADKEY pin
- Limited control by Infrared remote, the device can understand a few remote control codes, mainly to play the 5 hot-key files
- Complete control with an easy to use Arduino Library for the JQ6500, this gives you the most control with some extra features such as equalizer modes, looping options, direct access to up to 65535 files on the SD Card, track names etc.
- Complete control by Serial communication protocol over TX/RX
1. Simple Control with Manual Buttons To Ground
To wire for manual buttons, simply connect a wire from each of these pins to a button that connects the pin to ground momentarily.
Note that the first 5 files are playable by the K1-5 hot keys, additional files can only be accessed with NXT/PRV.
| PIN | Function |
| K1 | Hotkey to play 1st File |
| K2 | Hotkey to play 2nd File |
| K3 | Hotkey to play 3rd File |
| K4 | Hotkey to play 4th File |
| K5 | Hotkey to play 5th File |
| NXT/VOL+ | Press to play next file; Hold down to increase volume. |
| PRV/VOL- | Press to play previous file; Hold down to decrease volume. |
| PL/PAUSE | Pauses or Resumes the currently playing file. |
| SRC | Changes the file source, from on board memory to the SD Card (28p model only). Note that the source defaults to the SD Card if it is inserted, if not it will fall-back to the on board memory. |
2. Simple Control with ADKEY
The ADKEY pin allows for a slightly unusual connection of a number of buttons off one pin by using a resistor divider arrangement, as shown below (see previous section for descriptions of the functions). It’s probably not worth using this method on the 28P, method (1) above will do the same thing without needing the external resistors, on the 16P you may want to use this method to be able to use the NXT/VOL+ and PRV/VOL- buttons.

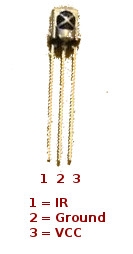 3. Limited Control with Infrared Remote
You can connect a standard IR Receiver’s signal output to the “VPP/IR” pin. I don’t have specifications on the IR codes, but have successfully used a standard 38KHz IR Receiver and a cheap remote control
The exact buttons on the control which will perform the functions are left to your experiment (I found that the numbers 1-5 correspond to playing the first 5 files on my remote).
I did find that this works best with short clips, the device tends to “miss” IR commands while playing tracks, so it’s best suited to playing a track completely.
4. Full Control with Arduino Library
For those of you using an Arduino, a library has been provided which gives you full control over just 2 pins (by default D8 and D9, but it’s up to you).
Full wiring details and download link complete with example code are available on github here:
5. Raw Serial Communications Details
If you’re not using the Arduino platform, or you want to write your own library, see these complete details of the JQ6500 Serial Communications protocol, again, if you are using an Arduino, check out the library above first as that is the simplest way!
Playback Modes For Manual Keying Methods (1 & 2)
Several playback modes are supported by these devices when using the simple button and ADKEY control methods described above.
- Immediate retrigger: a file can be started playing at any time cancelling any file already playing.
- Whole file single play: once started, a file will play to completion, files can not be started playing during the playback.
- Whole file multi play: while the playback button (hotkey) for a file is held down, the file will play to completion and repeat, when released the file will play until completion.
- Play while held down: the file will only play while the appropriate playback button (hotkey) is held down.
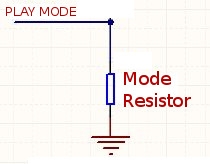 The selection of the playback mode is accomplished with a resistor selection connected from the PLAY MODE Pin to ground (28p) or by placing a resistor on the device (16p)
| [None/Float] | Immediate Retrigger |
| 51k | Whole file, single play |
| 33k | Whole file, multi play |
| 24k | Play while held down |
On the 16P, the PLAY MODE pin is not broken out, but you can add a resistor to an unpopulated location on the PCB. The 28P also has such a pad which you can use instead of the PLAY MODE pin if you wish.


The BUSY Pin
The devices have a pin called BUSY, when the module is playing a file then the BUSY pin outputs about 2.4 to 2.7v, when the module is idle it outputs 0v. Please note that this voltage is not sufficient to register as a HIGH on a 5v microcontroller (like an Arduino), or not reliably at least. So if you want to look at this pin you should either read it as an analog value, or level shift it from 2.7 up to 5v using your method of choice so you can reliably read it.
The Datasheet
Here is the Chinese datasheet for the JQ6500, pro-tip, copy and paste from the datasheet into google translate.